We are certainly making our way through the anatomy of a few tricks this year! If you haven’t already, go check out my anatomy series which covers an in depth breakdown on the:
Straddle
Front Splits
Spatchcock
Ayesha
Handspring
Iron-X/Human Flag
Today we are breaking down the next nemesis trick we want to conquer after learning our straddle. Yep – you guessed it! The shoulder mount.
Now just a quick lil disclaimer before I get started on the juicy anatomy goodness; the purpose of this blog is not to teach you how to shoulder mount, but to break down the mechanics of the movement to help you achieve it quicker and with great technique. Our instructors are best placed to instruct, so hit up your favourite one for a session on this! So what actually goes on in our shoulder mount? Well, similar to our straddle, our shoulder mount is an open chain trick that inverts the body, primarily driven by a vertical pull through the upper body and strong engagement of the trunk & hip flexors. This move can be broken down into 4 primary stages:
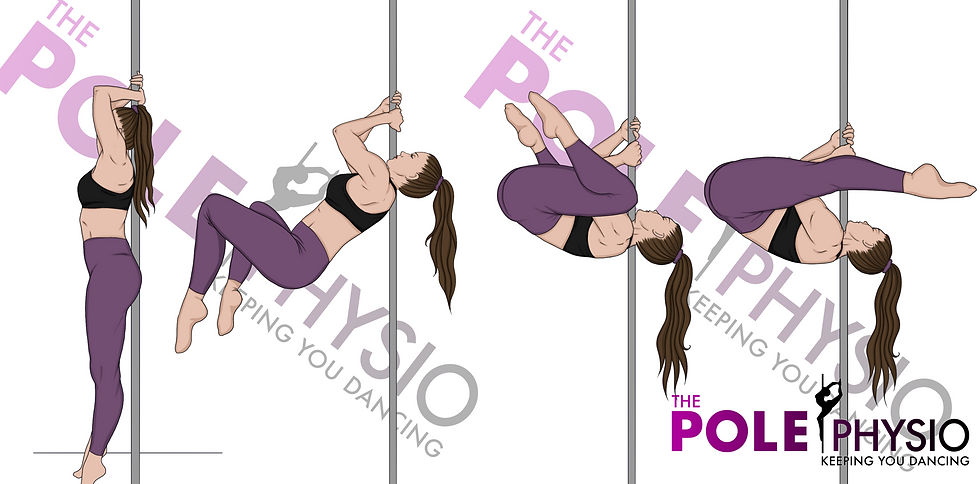
Let’s break down the anatomy of this move now.

The Upper Body To perform a shoulder mount, our upper body is required to:
Lift the arms and stabilise the shoulders at ~150 degrees
Engage a vertical shoulder pull to lift the entire body off the floor
Shoulder Stability Our shoulder elevation and stability comes from the key upward rotators (serratus anterior and upper trapezius) and the rotator cuff muscles of the shoulders. Without these muscles our body wouldn’t be able to even setup for this move.

Shoulder Vertical Pull
Our vertical pull is one of two primary movements of the shoulder mount. And this movement requires a great number of muscles to engage in co-ordination. Our vertical pull is comprised of:
An isometric pull through the bicep in our cup grip position
A strong vertical pull through our latissimus dorsi with assistance from our triceps throughout and pectoralis major/minor in the early stages
Scapula retraction and upper thoracic/chest lift driven by the mid/lower trapezius and rhomboid muscles
Grip change! Another way to work on your shoulder mount is with a twisted grip or elbow grip variation. The engagement and pulling principles of the arms remain the same but each grip variation will have its own nuances to work on in addition to the shoulder mount basics.

Anti-extension (abs & hip flexors) A shoulder mount movement is one of trunk flexion which takes the spine from an extended position to one that is flexed – i.e folded in half. We primarily use our rectus abdominus muscle for this movement, but our obliques also play an important role assisting the trunk flexion and ensuring we are lifting the hips up evenly.
Our abdominals not only flex our trunk but they play a very important role of taking our pelvis from an anteriorly tilted position in stage 1 to a posteriorly tilted position by the end of the shoulder mount. Our abdominals are able to perform this movement with the assistance of the extensor component of our gluteus maximus as well as our hip flexors (quads, iliacus & psoas predominantly).

Legs, legs, legs! And lastly our beautiful wide straddle is created with active hip flexion as just mentioned, combined with hip abduction and external rotation, provided by gluteus maximus, gluteus medius and the smaller stabiliser muscles of the hips. To allow this movement to occur our hamstrings and adductors are placed on stretch, providing active flexibility.
What’s the difference between a shoulder mount & straddle?
The great thing about the shoulder mount is it’s very similar to our straddle, with just a couple of key differences. The muscles we use are still the same and we engage them in exactly the same way. Which means that whilst you’ve been busy strengthening up your straddle you’ve already been prepping for your shoulder mount. Handy right?
There are a few important differences to note between a straddle and an invert:
Our contact point for our straddle is our underarm whereas the contact point is our upper trap in our shoulder mount. A shoulder mount is usually the first trick performed with this contact point so there can be a lot of initial discomfort when learning this trick.
Following on from point one, the change of contact point increases the distance from the pole to the hips which makes this movement harder for the abdominal muscles to stabilise
Our shoulder mount is usually our first introduction to the cup grip which requires greater arm strength to perform than our more familiar baseball grip used for the straddle
Our starting position for our straddle is in lumbar extension which increases the load required for the abdominal muscles to lift the knees up to a tucked position
Unlike our straddle, there is no tip back in a shoulder mount. This requires less eccentric strength of our upper back and for many people they will find a shoulder mount easier to hold.
Shoulder Mount Setup Cues As an advanced nemesis move, we want to use every trick in the book to give us a boost in the right direction! So correct setup and engagement for this move is imperative. Some simple cues we encourage are:

Placing the hands at head height. The higher they are the harder you’ll have to pull. We want to make this move as easy for you as possible
Look at where you’re wanting to go. If you’re looking forward your hips won’t get very high, so make sure you’re looking up.
Pull the elbows together and try to throw the pole across the room. By adducting and extending the arms you are maximising lat activation prior to this move. Our lats are our powerhouse muscle of our back and a very important muscle when it comes to the shoulder mount
Place the pole on your upper trap. The most painful part of a shoulder mount is the contact between the pole and the skin. But this is made even more painful if you placing the pole on your collarbone!
Start shoulder mounting with a gentle kick to give you momentum, but as you get stronger, work towards a no kick mount!
Ready to level up?? If you’re consistently nailing your shoulder mount, then it’s time to try a straight leg version. The muscle engagement remains the same but the distance of the feet away from the pole increases which loads up our abdominals & hip flexors! Strong anti-extensors are a must for this movement!

What’s in a kick? The final step to really nailing this movement is to take it aerially and remove the kick. A true sign of strength, the shoulder mount deadlift, is no mean feat and takes years for many to perfect. So don’t stress if you’re not up to it yet. All in good time!
Start working on this movement with bent knees and progress to straight legs when you’re ready!

Shoulder mount recap Well there you have it! A great little breakdown of our shoulder mount. If you’re wanting to work on your shoulder mount, make sure your body is firstly nailing these components off the pole:
Shoulder & scapula stability & control
Shoulder vertical pulling strength
Anti-extension/hip flexion strength
Hip abduction & external rotation strength
Active hamstring & adductor flexibility
Join me over the next few weeks as I take us on a journey of strengthening exercises to work on our shoulder mounts on the pole.
Want to get first access to these exercises? Sign up to our mailing list here
Have you been struggling to nail your Shoulder Mount but not sure why? Or recovering with an injury and it’s getting in the way of your pole?
Online telehealth appointments can be booked with the Pole Physio via our ‘Book Online’ page that can be found here. Assessment and tailored rehabilitation are provided in accordance with best practice and evidence-based treatment to help you unleash your 'poletential'.
Until next time, train safe.
The Pole Physio
x
Want to keep in the loop with the Pole Physio? Sign up to our mailing list here
Please Note:
Any artwork on this or other pages of https://www.thepolephysio.com is copyrighted and is not be reproduced without written permission per the terms of use and conditions.
A Shoulder Mount is an advanced level trick and conditioning should ONLY be undertaken if your straddle is strong and consistent and your instructor has deemed you ready to work on this trick. This information is general advice only and we are not liable for any injuries that may occur during training.
This page has been created to provide wonderful knowledge with the pole community and sharing of this page to pole friends and pole related facebook groups is actively encouraged.
https://www.startus.cc/company/euro-casa-design-build-european-cabinets
Click here provide members with discounts on over-the-counter medications, vitamins, and health essentials, promoting better health management and cost-effective wellness solutions. kaiserotcbenefits.com - more details here
Click here help you find recent death notices, providing information about funeral services, memorials, and tributes for loved ones in your area. obituariesnearme.com - more details here
Click here? Many users have had mixed experiences with the platform, so it's important to read reviews and verify deals before booking. istravelurolegit.com - more details here
AV在线看 AV在线看;
自拍流出 自拍流出;
国产视频 国产视频;
日本无码 日本无码;
动漫肉番 动漫肉番;
吃瓜专区 吃瓜专区;
SM调教 SM调教;
ASMR ASMR;
国产探花 国产探花;
强奸乱伦 强奸乱伦;
代发外链 提权重点击找我;
谷歌蜘蛛池 谷歌蜘蛛池;
Fortune Tiger…
Fortune Tiger…
谷歌权重提升/ 谷歌权重提升;
谷歌seo 谷歌seo;
谷歌霸屏 谷歌霸屏
蜘蛛池 蜘蛛池
谷歌快排 谷歌快排
Google外链 Google外链
谷歌留痕 谷歌留痕
Gái Gọi…
Gái Gọi…
Dịch Vụ…
谷歌霸屏 谷歌霸屏
负面删除 负面删除
币圈推广 币圈推广
Google权重提升 Google权重提升
Google外链 Google外链
google留痕 google留痕
代发外链 提权重点击找我;
谷歌蜘蛛池 谷歌蜘蛛池;
Fortune Tiger…
Fortune Tiger…
谷歌权重提升/ 谷歌权重提升;
谷歌seo 谷歌seo;
谷歌霸屏 谷歌霸屏
蜘蛛池 蜘蛛池
谷歌快排 谷歌快排
Google外链 Google外链
谷歌留痕 谷歌留痕
Gái Gọi…
Gái Gọi…
Dịch Vụ…
谷歌霸屏 谷歌霸屏
负面删除 负面删除
币圈推广 币圈推广
Google权重提升 Google权重提升
Google外链 Google外链
google留痕 google留痕